Website Security – A Breakdown of How We Approach WordPress Security

Join us through a deep dive of how we approach the security of the WordPress websites we host.
Join us through a deep dive of how we approach the security of the WordPress websites we host.
Oh man, this year went by way too fast! I know it’s cliché to say but time goes by faster the older you get.
It’s time again for our yearly review post! It’s been a busy year, unfortunately our blogging here doesn’t reflect that… you can still find our 2017 year in review in our home blog feed. Goal for 2019, a return to blogging #resolutions!
At the beginning of 2018, we set our general goal of “doing great work for awesome people”. As part of that, we thought it would only be appropriate to “do great work with awesome people” which we meant “with” in the physical sense. As a distributed team, we can sometimes take the importance of face-to-face interaction for granted. So, this year, we made it a point to travel more and meet some of our clients on their turf.
Our first trip of the year was to visit the headquarters of The Foursquare Church in Los Angeles this February. This trip was planned in the middle of the project and gave us a great opportunity to reveal the work in progress, provide some initial hands on training, as well as do some further project planning.
It was also a great time of work and play where we got to sample some great food and beer, stroll down Hollywood Blvd, and visit the Griffith Observatory. This trip was also the first time Blake and Elizabeth were able to meet face to face.


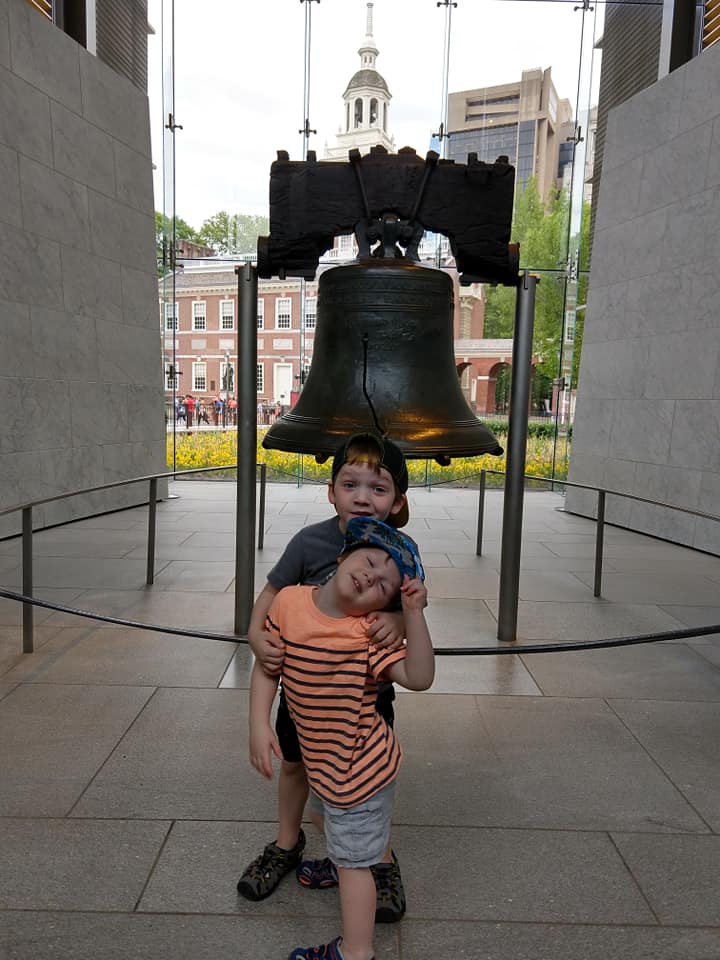
Our second trip this year was to the city of brotherly love. Blake and I took our families to Philadelphia to meet up and plan a kickoff project with CCEF. We met at their main office, a beautiful, historic building near the campus of Westminster Theological Seminary, and did several planning sessions for all aspects of the site with many people that we’ve only ever previously met via email.
We stayed in an interesting Airbnb in downtown Philadelphia. During the day, it was a great location with quick access to fun for the family and public transportation for us. However, we did get woken up to shouts of “Don’t Shoot!” early on one of the mornings.


Our team has also grown in 2018! Stephen Dickinson is helping us with some design and front-end development. We’ve really enjoyed having him contribute to our client projects. He’s got an intentionality with his approach and takes the time to invest in tools for projects that make them easier (and better) to manage over the long haul. In his free time he also volunteers as a support moderator for the WordPress.org forums.
We’re one quarter in and it is looking like a great year. Excited to figure out more ways to quickly serve you, our wonderful clients. Onward!
On that note, we are looking to grow our team this year! If you’re interested, check out the latest posting for a Support and Technology Specialist.
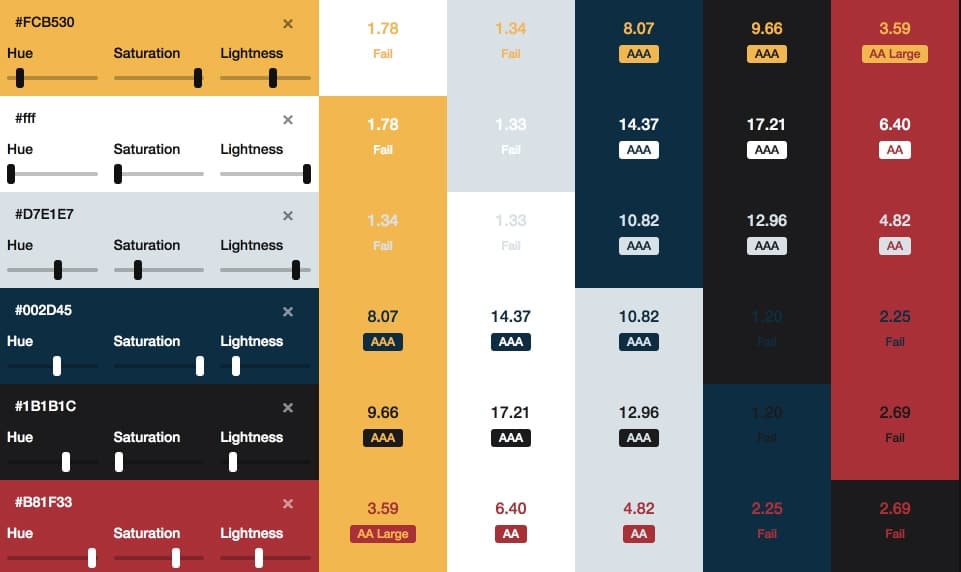
Practical web accessibility is a mindset. Accessibility, broadly speaking, is helping something be as usable as possible to a broad range of users – especially those with visual impairments. The following isn’t a comprehensive list of accessibility requirements for modern websites, but we do give a general mindset and high level checklist for ensuring we don’t overlook common items. This list can provide big improvements in the usability of a website for those with web accessibility concerns.
With CSS comes great responsibility. Styles can be used to completely manipulate a site’s layout and visually rearrange the site in a way that doesn’t match the actual flow of the content. For accessibility, we always strive for a logical layout for the site and the content so that if you removed all the site’s styling, you could read the site from top to bottom and it would clearly convey the intended message.
With this approach to readability, proper markup is also used to ensure content is assigned the appropriate value for its intended purpose. This includes: headings, forms, buttons, images, and links. When these elements are given the appropriate markup, it helps to define content hierarchy as well as tell screen readers more information about the content that is present.

As we’ve been looking to bring on more talented people into the mix here at LimeCuda, one area that we’re focusing on improving is documentation. At the core of creating any documentation is a need to get expertise, knowledge, and experience out of our own heads and presented in a way that is digestible by anyone coming into our business.
With this focus, we are starting by focusing on support and procedural documentation.

We are cumulatively responsible for about 200 websites with a wide array of industries and purposes. Even with great variety between sites, we do find ourselves answering some of the same questions on a regular basis… Issues around domains, SSL, and general hosting are very common for us. By creating support documentation to answer these recurring questions, we no longer have to rely on bespoke responses for these issues and can provide a quicker response with reliable and tested information.
To help us in aggregating this information, we’re working to build out this documentation within the “Docs” feature in Helpscout. If you’re an existing customer, you likely received an email about how to submit a support ticket (also powered by Helpscout). By building the documentation here, we’ll have a seamless approach for quickly adding this documentation to our email responses to your requests.
It’s difficult to have a functioning business if you don’t document the why and how general tasks are to be performed for your business. This would include general processes like our process for handling single-developer sprints, configuring DNS, or full checklists like our checklist for a WordPress SSL / HTTPS migration. This documentation is crucial for capturing experience and lessons learned from performing some of these tasks over-and-over and passing it along to new team members when they join. These ever-evolving documents help to ensure that every time we perform a task, it is the best we’ve ever done it.
We have multiple places where we capture procedural documentation. We are a business built around an Open Source ecosystem and have a strong bent towards transparency and sharing. With that ethos, our first place for capturing this documentation is on our public resource site Fewer Than Three. This documentation is fully available to anyone to use in improving their own websites and businesses.
For things that are specific to us internally at LimeCuda, we utilize the Wiki features available within Github. This way, it is easily accessible when creating new tasks for specific projects that can be assigned to anyone on our team.
I had a rather irritating experience trying to comment on a blog recently. A vendor/tech partner we use published a blog post with a couple interesting points. However, one of the things they were recommending in their post was something that was completely at-odds with their own technical infrastructure.
Being a kindly sort I commented on the post asking why was this one aspect mentioned as I thought it wouldn’t work on their platform. Here’s where things went south…
Sad Blake! Even worse, they approved some other comments AND removed the part of the post I had questioned! I couldn’t believe it, this was not behavior consistent with our industry. The whole point of a blog allowing comments is the transparency and public conversation that they allow.
This experience really broke my trust in this company’s blog.
I understand that perhaps there was some intern or marketing person that wrote the post and really didn’t clear the content past anyone who should have caught it. Editing the post to remove incorrect information is perfectly acceptable.
There are three more reasonable routes they could have taken though…
In this story we are an ideal longtime customer of theirs, to the order of tens of thousands of dollars over our account history. We have sent a many people their way and are major brand advocates. This whole story, while minor and a trivial issue really left a bad taste in my mouth.

A child page is a page that “lives” in hierarchy underneath another page (the parent). In the example below, both “Our Team” and “Company History” are child pages of “About”.
A sitemap is a listing of public webpages or categories on your site.
When assembling a sitemap / site architecture, you want to keep it as flat as possible. Having parent/child relationships creates just that between the content on those pages – a relationship.
Once you add multiple layers, the relationship between the content becomes convoluted. This creates a hierarchy that is difficult for your users to navigate as well as increases the likelihood that pages will not be crawled and indexed by Google.
Should you find yourself in a situation with multiple levels of relationships (four or more) it may be a clear sign that you need to re-strategize the site’s architecture. Sites with thousands of pages of content present a challenge, but it is a challenge you can overcome.
Take a look at how massive sites are addressing the hurdle:
[genesis_column size=”one-half” position=”first”]
[/genesis_column]
[genesis_column size=”one-half”]
[/genesis_column]
There are capabilities within the WordPress ecosystem to automatically generate both HTML sitemaps (what we are talking about here) and XML sitemaps (which get submitted to search engines).
Strive for a logical and sensible sitemap. Keep it simple.
There are three primary effects of making a page a child.
If you are modifying existing pages, make sure that if the URL changes, you redirect the old URL to the new URL. We have written about why you should redirect your defunct pages.
But is it the best “value”- even at $0.00? Is anything ever really free? Can we really get something we want without trading something for it?
Don’t get me wrong, we love free plugins too. There are free plugins that we use almost all of our WordPress projects. There are many high quality and reliable plugins built by people that we know (some we like 😉 ) and trust.
However, we really love paying for premium plugins as well. But, when many in our community expect things for free, we feel the need to dig into why we love to pay for WordPress plugins.
Open Source works phenomenally, but sometimes the author / company’s interest in providing well for themselves is an even more effective and predictable incentive.
It is not from the benevolence of the butcher, the brewer, or the baker, that we expect our dinner, but from their regard to their own interest.
– Adam Smith
The Wealth Of Nations, Book IV, Chapter II
The first thing you might expect us to reference here is quality. The assumption is that if you get it for free you must be sacrificing quality.
In reality, free does not automatically translate to a lack of quality. Conversely, paid or premium items do not automatically guarantee a high level of quality.
Quality in WordPress plugins is a highly objective matter. Does the code follow security best practices? Does it do what it promises (and many times, only what it promises), and is it easy for our clients to use. (Note: here is how we feel about extending Enterprise-level WordPress with plugins)
In our space, there are many free plugins that greatly outrank the premium plugin alternatives in terms of quality.
The reasons are also tied to incentives. Companies can build extremely profitable businesses on the back of a free plugin via “Pro” add-ons, extensions, support, and connections to larger service projects. (AKA Freemium) Also, many individuals take pride in their public WordPress reputation and are incentivized to maintain quality as a matter of pride (no negative interpretation implied).
Even though they’re not being incentivized through direct plugin sales, there is still a huge pressure to maintain the quality on a free WordPress plugin.
So, quality could be a reason but why else do we really love to pay for plugins?
It’s reliability. If there is no path to getting paid for their work, we cannot rely on that developer to keep the plugin updated with current WordPress versions or provide support for the occasional bugs.
For us, this is the most important reason why we’re happy to pay for code used on our client sites. We’re not looking for quick solutions for these features. When we choose a plugin (or build a feature ourselves) we are committing them to a “path dependency“. We want it to be a fantastic path.
With any plugin that we choose to integrate, we’re looking for long-term, quality, and reliable sources that will best serve our sites for as long as possible.
Have you experienced this? Any tools or resources you excitedly pay for rather than get for free? Tell us about it in the comments!
This begins a new series we’re doing on “Ruthless Efficiency”.
Short tips to redeem time from mundane, repeatable, inefficient tasks. The result: more joyful work, less stress, more time for creativity.

You know the drill, it is a hidden storage place where something lives that you just copy/cut and then when you need it you “paste” it. Simple, binary, one thing in, one thing out.
Cut
Windows: Control (Ctrl) + X
Mac: Command (Cmd) + X
Copy
Windows: Control (Ctrl) + C
Mac: Command (Cmd) + C
Paste
Windows: Control (Ctrl) + V
Mac: Command (Cmd) + V
This is really one of my favorite tools I use all-day-long. It is called “clipboard history”. The concept is simple, your clipboard ends up accumulating all the stuff you copy and you can go back and re-paste stuff from days or weeks ago. I can search and recall text I copied weeks ago or thousands of copies ago.
I use a Clipboard history tool for Windows called Ditto. While it is free and works great, it is not the prettiest…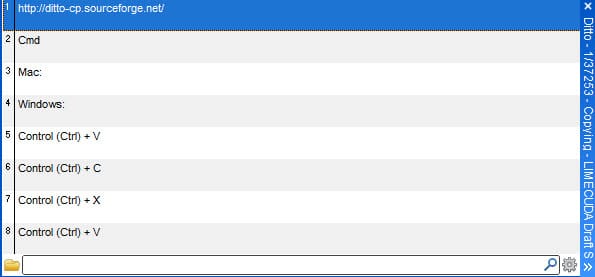
I just hit a special key combination and it pulls up the above interface. I can just start typing part of a previous item I know I had copied. So if I had previously copied:
<p id="aesc"><a href="https://www.aesc.org/" title="AESC - The Association of Executive Search and Leadership Consultants" target="_blank"><img src="/assets/img/common/aesc.gif" alt="AESC - The Association of Executive Search and Leadership Consultants"></a></p>
I could find it by starting to type “aesc” or “href” – basically any part of the paste I remember can help me recall it to use again.
[genesis_column size=”one-half” position=”first”]
[/genesis_column]
[genesis_column size=”one-half”]
[/genesis_column]

I don’t need to work hard to sell you on this. A text-only blog post is pretty dull and uninspiring.
Adding an image to a post (or page) livens them up with visual interest AND it helps someone more quickly understand what your post is about. (#humblebrag we really like what the image conveys on our recent website launch ideas post)
Intellectual Property and “creative use” is an extraordinarily complex subject and even differs across the globe. Your best bet is only use images you are permitted to use.
We’ve had several clients who accidentally used an image they didn’t have permission to use. This can result in a strongly worded letter threatening legal action. This can sometimes feel like a bit of an extortion game to try to get you to pay up. Just avoid that mess and use a little extra effort to get legitimate images.
Here are four good sources for usable images….
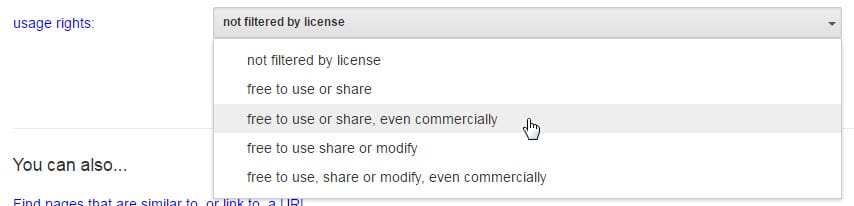
When you use Google Image Search or Flickr there are options to filter by license. Find free images already cleared to use.
Google Image Search
Click the “Advanced Image Search” when searching in Google Images. Filter by the right license and then go find that image!
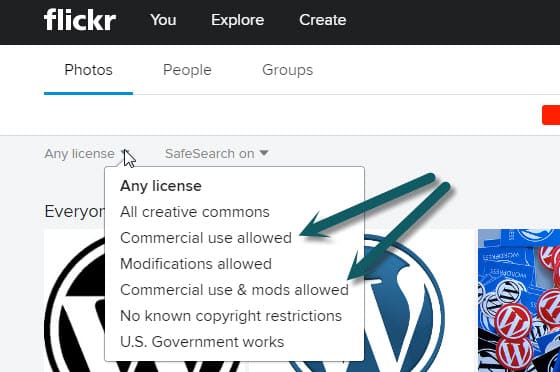
Flickr
Like Google, Flickr has a massive collection of great images.
We have a monthly subscription to Big Stock Photo. There are quite a few great stock image sites. Be prepared they can easily be $10-40 per image but this is a small cost if the image is perfect.
Free stock photo sites: unsplash.com, photopin.com, magdeleine.co, picjumbo.com, deathtothestockphoto.com, morguefile.com, pixabay.com,
This is our favorite option. Get a local professional photographer to take a bunch of pictures. Make a list of shots you know you need and also have shots take of anything that is unique or interesting – you never know what future photo needs may arise. Here are some ideas of what to get photographed:
If there is a really great shot on someone’s website – they might be willing to let you use it. In this case, contact them and get their written permission to use it. Setting up the “ask” well can go a long way to getting clearance.
When you link to a page, Google not only sees that as an indication of trust it gives them an idea on the subject matter of the page.
If we have a page on our site all about our “WordPress Expertise” and we intentionally linked to it with that phrase or variations of it – Google would get the idea what that page was all about! (should be noted that linking to that “wordpress expertise” page within this post is so meta and a perfect case-in-point 😉 !)
Now, getting these links from other websites is even better but you can and should be interlinking within your own site! There is a “PageRank damping factor” that won’t let you just keep escalating the power of interlinking on your own site, but you should still interlink when it makes sense and do it with SEO intentionality.
If interlinking isn’t easy, you won’t do it!
In WordPress adding a link to a piece of content within the same site is stunningly easy.
Highlight the text you want linked, type Ctrl+k (Command+k on Mac) or click the link icon. Then start typing a part of the title or URL for the content you are wanting to link.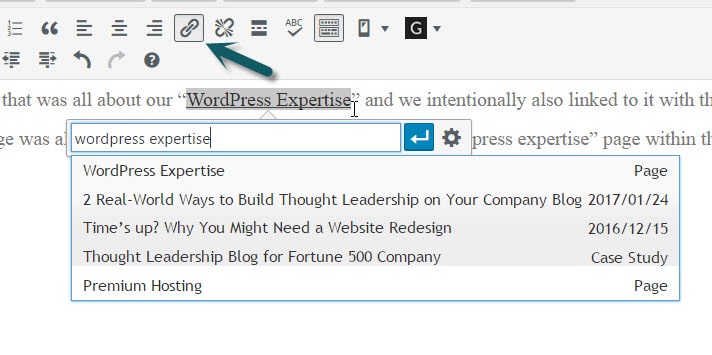
If you only have 5 keywords that map to 5 pages, then it may be manageable within your head. However, if you have dozens of keyphrases you are pursuing or you are working within a team of content writers then you need a better method.
Here’s the Keyword Interlinking Strategy that works for us…
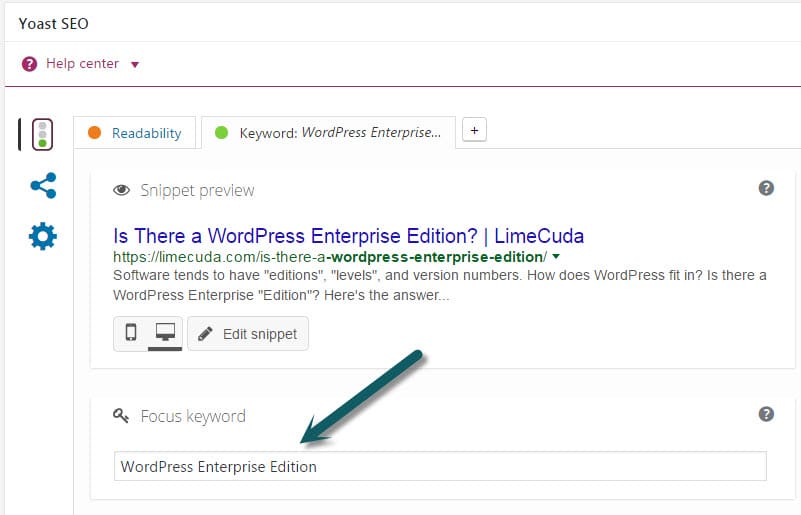
1. Assign a Focus Keyword to Each Post
In the Yoast SEO tool this is easy and hopefully you’ve been doing it as you go along. If not, go back through and assign a focus keyword (think keyphrase) to each post.
2. Export a List of Your Posts
Use a tool like WP CSV to export a CSV file of all your posts. This file contains a column named “cf__yoast_wpseo_focuskw”. This “custom field” value is what contains your SEO Focus Keyword. So now you have a list of all your posts with the keyword mapped to each.
We recommend importing this CSV into a Google Sheet. Then you can easily share it with your team and keep it updated over time. If you only occasionally add posts it may be worth it to just manually add new Post Titles and Focus Keywords to your Sheet as time goes on.
3. Use the Spreadsheet when writing content
When you are writing a post (before and after) reference your spreadsheet and see if there are natural (and helpful!) ways you can link to these posts – using the keywords!